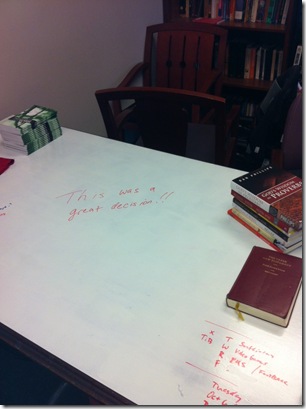
Before writing any sermon, teaching material, article, or outline I map it out on a piece of paper. I cannot think on a computer. I need open space. Hence the stack of notebooks on my desk.
Awhile back I got the crazy idea (I think through seeing something online) to turn my desk into a whiteboard. Last week I finally did it. I bought a can of dry erase paint and got to work. Here is how:
- Make sure it’s Friday.
- Clean your desk. (For some of us this is the most difficult part).
- Make sure that it’s really clean. I mean really clean.
- Put on a couple coats of white primer.
- Get really loopy off the fumes.
- Write several articles that make no sense while waiting for it to dry.
- Wake up from fume-induced coma.
- Mix & Apply special Dry Erase paint. Apply a couple coats.
- Wait over the weekend, dreaming about the awesomeness that awaits you.
- Come back to work on Monday and fulfill your childhood dream of writing on desk.
I’ve had my super amazing desk for over a week now and I love it. I’m not wasting tons of paper writing little meaningless notes. I also have a bigger space to dream, draw pictures, and connect my thoughts. And let’s be honest. It’s really fun to write on your desk.
Furthermore, this has helped in counseling and teaching sessions in my office. I’ve benefited from being able to write something out or draw pictures. It’s also good if you have little children, like I do, that like to play in your office.
If you decide to turn your desk into a whiteboard I have a few tips for you.
Tips:
- Don’t throw away your notepads. You’ll still need them occasionally.
- Erase daily.
- Make sure that you keep your arms, clothes, etc. away from your writing area.
- Before starting the project make sure the paint is not outdated. (That’s the problem for many of the people on Amazon—hence the poor reviews)
- Apply a generous amount of primer, especially if your desk is a darker wood.
- Use low odor dry-erase markers.
- Erase with a rag.
- Enjoy

A less-permanent way is to lay down large white poster paper on the surface of the desk and weight it down with a pane of glass. Glass works great with dry-erase. My office is in a fishbowl of offices in the center of the plant I administer. My boss likes to explain production ideas to team leaders by dry-erasing plans on the glass overlooking their departments.
Another tip: If you have old dry-erase markings that won’t wipe off, mark through it first with a fresh dry-erase pen. It’ll wipe right off then.
If you teach and share a classroom with other classes where you have to erase what you’ve written but want to write it back, snap a photo with your phone before you erase it. You’ll see where you were and be able to recreate it quickly before your next class. You will also be able to print it out if you want to give it as a handout later. This may work also if you want to remember later what you wrote on your desk.
Further to that: If you have to erase and are getting in the habit of snapping photos of your work, Evernote is an amazingly helpful tool for categorizing and searching through those images. It will even recognize handwritten text within the images (with a much better approach than traditional OCR).